gperftools
安装
源码安装
在 64bit 系统上需要先安装 libunwind(http://download.savannah.gnu.org/releases/libunwind/libunwind-0.99-beta.tar.gz,只能是这个版本),这个库为基于 64 位 CPU 和操作系统的程序提供了基本的堆栈辗转开解功能,其中包括用于输出堆栈跟踪的 API、用于以编程方式辗转开解堆栈的 API 以及支持 C++ 异常处理机制的 API,32bit系统不需安装。
1. 安装 libunwind(32bit系统,跳过)
wget http://download.savannah.gnu.org/releases/libunwind/libunwind-0.99-beta.tar.gz
tar -zxf libunwind-0.99-beta.tar.gz
cd libunwind-0.99-beta/
CPPFLAGS=-U_FORTIFY_SOURCE ./configure
make
make install
configure时需添加 CPPFLAGS=-U_FORTIFY_SOURCE 否则会报错,如下:
gcc -DHAVE_CONFIG_H -I. -I../include -I../include -I../include/tdep-x86_64 -I. -D_GNU_SOURCE -DNDEBUG -g -O2 -fexceptions -Wall -Wsign-compare -MT setjmp/longjmp.lo -MD -MP -MF setjmp/.deps/longjmp.Tpo -c setjmp/longjmp.c -fPIC -DPIC -o setjmp/.libs/longjmp.o
/usr/include/x86_64-linux-gnu/bits/setjmp2.h:26:13: error: 'longjmp' aliased to undefined symbol '_longjmp
2. 安装 gperftools
# 安装依赖
apt-get install graphviz ghostscript
# graphviz:用于绘制 DOT 语言脚本描述的图形

wget https://github.com/gperftools/gperftools/releases/download/gperftools-2.10/gperftools-2.10.tar.gz
tar -zxf gperftools-2.10.tar.gz
cd gperftools-2.10/
./configure
make
make install
使用方法
CPU 性能分析
1. 代码插桩
// 1. 插入头文件:
#include <gperftools/profiler.h>

// 2. 在待分析的代码块前插入 Profiler 开始语句
ProfilerStart("file_name.prof");

// 3. 在待分析的代码块后插入 Profiler 结束语句
ProfilerStop();
完整示例:
#include "inc/func.hpp"
#include <gperftools/profiler.h>

int main() {
  ProfilerStart("cpp_demo_perf.prof");

  PrintString("This's a demo.");
  Func();

  ProfilerStop();
  return 0;
}
2. 编译链接
编译时我们需要将 profiler 库和 libunwind 库链接到可执行程序,对应的 CMakeLists 文件中的语句为:
target_link_libraries(${PROJECT_NAME} profiler unwind)
3. 运行可执行程序
找到编译得到的可执行程序,并在终端中运行:
./cpp_demo
正常情况下,会生成一个我们上文中所提到的 .prof 文件。
4. 生成图形化分析报告
- 解析为
.pdf文件:
pprof --pdf cpp_demo cpp_demo_perf.prof > cpp_demo_perf.pdf
内存分析
内存泄露检查
分析报告说明

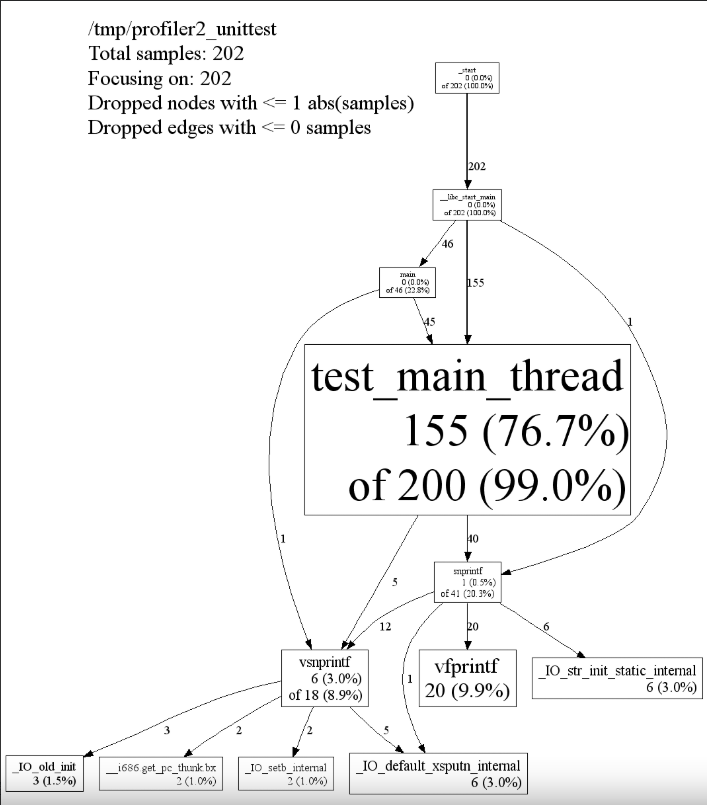
报告会显示函数之间的调用关系, 以及每个函数所占用的时间. 图中每个节点代表一个函数, 每条边代表它们之间的调用关系. 每个节点都有这样的格式
Class Name
Method Name
local (percentage)
of cumulative (percentage)
- cumulative:这个函数占用的总时间, 也就是这个函数自身的代码占用的时间, 加上调用其他函数占用的时间.
- local:这个函数自身代码占用的时间. 节点越大, 这个函数的 loacl 时间就越长.
- 每条边上的数字:调用所指向函数占用的总时间.
也就是说, cumulative 等于这个节点所有 “入度” 之和; local 加上这个节点所有 “出度” 之和等于 cumulative.
时间的单位取决于收集频率. 如果是默认的每秒 100 次, 则单位大约是 10 毫秒. 在上图的例子中, test_main_thread 的总执行时间约为 2000 毫秒, 其中约有 1550 毫秒是该函数本身代码占用的, 400 毫秒是其调用 snprintf 占用的, 50 毫秒是其调用 vsnprintf 占用的.
pprof 导出报告时会省略掉一些耗时较小的节点和边. 我们也可以通过参数指定省略的阈值.
--nodecount=<n>: 只显示最耗时的前 n 个节点, 默认为 80.--nodefraction=<f>: 只显示耗时占比不小于 f 的节点, 默认为 0.005 (也就是说耗时占比不到 0.5% 的节点会被丢弃). 如果同时设置了 –nodecount 和 –nodefraction, 则只有同时满足这两个条件的节点才会保留.--edgefraction=<f>: 只显示耗时占比不小于 f 的边, 默认为 0.001.